
Selection modes and masks
It isn't always efficient to have the Hypergraph window open when you want to select an object at a
particular level within its hierarchy. Maya allows you to select items in different selection modes
depending upon your specific needs.
There are three main types of selection modes: Hierarchy, Object and Component. You use these modes
in order to mask or limit the selection of other objects in order to select only the types of items you
want. When you use a selection mask you are filtering out or masking items you don't want to be chosen
as part of the selection.
The icons for the three modes appear on the Status Line.

When you first start Maya, the default selection mode is set to Objects. This is useful for much of your
selection work with Maya, with a few exceptions. When you want to select items that have been
grouped, set the selection mode to Hierarchy.
Tip
If you set the selection mask, it will remain that way until you change it again. If an item won't select
for you in Maya, you should check the selection mask setting to see if it is set correctly.
To use the Hierarchy and Combinations selection mask
1. On the Status Line, choose the Select by Hierarchy and Combinations icon
The Selection Mask icons update to display the three selection choices.
2. On the Status Line, choose the Select by hierarchy icon.
Select by hierarchy ensures that when you select items they are selected at their parent or root
node.

3. In the scene view, shift-click Column and Column1 so they are selected simultaneously. (Do not
be concerned that they highlight in different colors.)
Pivot points
A pivot point is a specific position in 3D space that is used as a reference for the transformations of
objects. All objects (curves, surfaces, groups) have pivot points.
When you group objects in Maya, a new node called a parent node is created for the group of objects.
The pivot point for the group's parent node is placed at the origin (0, 0, 0). This is useful if you later
want to duplicate and rotate the objects radially (that is, in a circular fashion around the pivot).
To group the two columns
1. Ensure Column and Column1 are selected.
2. From the main menu, select Edit > Group > .
3. In the Group Options window, select Edit > Reset settings. Set the following options:
o Group Under: Parent
4. In the Group Options window, click Group.
Maya groups the objects together in a hierarchy and the pivot point is positioned at the origin.
(When the pivot point is relocated to the origin the Move Tool manipulator for the selected group
appears at the origin)
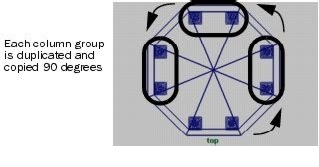
With the two columns grouped, you then duplicate the columns with a rotation option, the groups will
duplicate and rotate around the pivot point at the origin (0, 0, 0).
To duplicate and rotate the group
1. With column group selected, select Edit > Duplicate > from the main menu.
2. In the Duplicate Options window, select Edit > Reset settings and then set the following options:
o Rotate: 0 90 0
o Number of Copies: 3
3. In the Duplicate Options window, click Duplicate.
The columns are duplicated and rotated by 90 degrees with each copy.
Save your work
Your temple is taking shape! Save your work before proceeding to the next lesson.
To save your Maya scene
1. To save your Maya scene, select File > Save Scene As.
2. Type Lesson3Columns in the file browser area reserved for file names.
3. Click Save.
No comments:
Post a Comment