
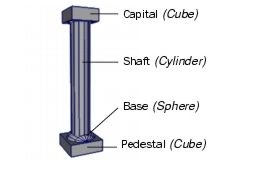
Workflow overview
The columns are made up of multiple primitives that are moved, scaled, and rotated into position. Once
the first column is created, with each component named and accurately positioned, you will group and
duplicate it to create others.
1. From the Main Menu, select Create > Polygon Primitives > Cube > .
2. In the Polygon Cube Options window, select Edit > Reset settings and then set the following
options:
o Width: 1.75
o Height: 0.6
o Depth: 1.75
Leave the other options at their default settings.
3. In the Polygon Cube Options window, click Create.
Maya creates a cube primitive and positions it at the origin.
4. In the side view, move the cube upwards (Y axis) so it rests on the top surface of the temple
base.
You can do this using the Move Tool or with the Channel Box. If you use the Channel Box, enter a
Translate Y value of 2.3.
You may find it useful to dolly or tumble the scene view to obtain a better viewpoint.

5. In the Channel Box, rename the cube columnPedestal.
To create a polygonal cylinder for the shaft
1. From the main menu, select Create > Polygon Primitives > Cylinder > .
2. In the Polygon Cylinder Options window, select Edit > Reset settings and then set the following
options:
o Radius: 0.5
o Height: 6
o Subdivisions Around Axis: 12
Leave the other options at their default settings
3. In the Polygon Cylinder Options window, click Create.Maya creates the cylinder primitive at the origin.
4. In side view, move the cylinder upwards (Y axis) so it rests on the top surface of
columnPedestal.
You can do this using the Move Tool or with the Channel Box. If you use the Channel Box, enter a
Translate Y value of 5.6.

The capital for the column rests on top of the column and is very similar to the pedestal. You duplicate
the pedestal and position the duplicate at the top of the column.
To duplicate the pedestal to create the capital
1. With only columnPedestal selected, select Edit > Duplicate > from the main menu.
The Duplicate Options window appears.
2. In the Duplicate Options window, select Edit > Reset settings and then set the following options:
o Translate: 0 6.6 0
o Scale: 0.8 1.0 0.8
Leave the other options at their default settings.
3. In the Duplicate Options window, click Duplicate.
Maya creates a duplicate of the columnPedestal object and moves and scales it based on the
options you set.
Note
If you positioned the geometry for the column using the Transform Tools and your mouse, the Y
translate values may be incorrect for your particular model. You may want to continue positioning the
objects by visual reference using your mouse.
Using the duplicate options is an alternate method for positioning and scaling duplicated objects
when you can anticipate its final location.

4. In the Channel Box, rename the duplicated cube columnCapital.
The base for the column rests on top of the pedestal. You will create the base using one half of a NURBS
sphere primitive and then move and rotate it into position. You will do this by modifying the creation
options for the sphere primitive.
To create a NURBS sphere for the column base
1. Select Create > NURBS Primitives > Sphere > .
2. In the NURBS Sphere Options window, select Edit > Reset settings and then set the following
options:
o Start Sweep Angle: 0
o End Sweep Angle: 180
o Radius: 0.75
o Number of Sections: 8
o Number of Spans: 4
Leave the other options at their default settings.
3. In the NURBS Sphere Options window, click Create.
Maya creates a half-sphere primitive at the origin.
To rotate and position the sphere on the pedestal
The sphere needs to be rotated 90 degrees and then positioned on top of the pedestal.
1. In side view, rotate the sphere so that the dome part is pointing up.
This is accomplished by either of the following methods:
o Rotating the sphere about the X axis using the Rotate Tool's manipulator handle.
o Using the Channel Box to change the Rotate X value to
-90.
2. Move the sphere so it rests on the top surface of columnPedestal (Translate Y = 2.6, if you have
been inputting values into the Channel Box).
3. Using the Scale Tool, scale the sphere along its Z axis (blue manipulator handle) so that the
sphere becomes slightly squashed in appearance.
When you scale an object non-uniformly along one of its axes, you are scaling it
non-proportionally.

4. In the Channel Box, rename the sphere columnBase.
No comments:
Post a Comment